Making Better Pots
I want you to more than succeed. I want you to excel. There is a wealth of information on my website and links to hundreds of other pages, each of which contains even more links. So please explore this page and a few of the links on the bottom to get you going.
Here are some tips:
- It is normal for beginners to have trouble keeping their pots on-center.
With each new pot, see if you can get a little farther along before the pot gets off center. - Centered pots are easier to throw and trim than off-center pots.
- If you plan to trim a pot, be sure the lip is level. Cut the lip off with your needle tool to level it if you need to.
- Off-center pots can be beautiful, but you will have to trim them on the wheel when you first make them to get them down to a decent weight.
- The clay must be adequately wedged. It there are lumps or air bubbles in the clay it is hard to center. Even if you do manage to get it centered – as soon as you stick your thumb into the clay to open it up, you displace the lumps and bubbles and the clay gets off center again.
- The clay must be adequately lubricated. If the clay gets dry, it twists and wrinkles.
- That happens because of the friction and drag caused by your hands sticking to the spinning clay. Conversely, too much water is a waste and a detriment. It fills up the splash pan and makes your pot too soggy and weak.
- The wheel sbould be spinning before you put your hands on the clay. First, lubricate the clay, then apply gentle pressure and then use more force. When you let go of the clay – do it gradually, as the wheel spins, to keep your pot on center.
- Don’t make jerky movements or twitch. Any sudden movements of your hands or changes in the wheel speed can throw the pot off-center.
- Avoid thin spots in the wall of your pot. Keep your finger pressure steady and the gap between your fingers even as you pull up the clay.
- Work small first. If you can’t execute a technique or form with two pounds of clay, you won’t be successful with 3 pounds.
- Make your throwing lines close together. They should be about 1/8 of an inch apart.
Making good pots:
Use adequate lubrication, i.e., water, but remember to empty the splash pan before it overflows. First spin the clay, then touch the clay gently, slowly applying more pressure. Don’t twitch or jerk your hands, use steady pressure. Don’t goose the foot pedal either. Sudden changes in wheel speed jerk the pot off-center. When pulling up, throwing lines should be close together. To achieve this, pull up slowly relative to the speed the wheel is turning. The slower the wheel is spinning, the slower you should ascend. Slow the wheel speed as you ascend and your fingers get close to the top of the pot. Also, slow the wheel speed when you work on wide or delicate forms. Don’t make the lips too thin and wimpy. Making better pots: Work quickly. Maximum of 15 minutes per pot. Make the pot grow with each pull. Don’t waste time on off-center pots. Trash the pot as soon as it gets off center. Keep the walls uniform in thickness. Never create a thin spot in the middle. Weigh your clay. Begin with 2 pounds of clay. When you can make a good 2 pound pot, try using 3 pounds and making larger versions. Practice making tall cylinders. Don’t save them, practice making them taller and thinner!
How to make beautiful pots:
Master the above. Look at pots in galleries and books. Sketch the forms you like. Use tracing paper for symmetry. Bring your sketchbook to class and use it! Use ribs when you throw to get clean, flowing curves. Give yourself the authority to be bold and decisive. Wimpy is always bad! Work in sets. Make 5 similar things. Evaluate and discard the weak forms and pots. Come to class with a plan. Know what forms you want to work on. Ask for help when you need it.
PRODUCT DESIGN:
When you, as a potter, create something, you are doing product design. Reviews of products abound on the internet. “Which potato peeler is best?” “Does the ergonomic grip really work?”
Once you have the skill to execute a plan, you are designing. You won’t be able to fully evaluate and appreciate your work until you use it at home. Maybe it doesn’t fill the intended purpose, but it may serve other functions. It may become a loved and frequently used item; maybe it will wind up in the basement.
Think about your design and don’t quit after the first attempt. Make your pots evolve. It takes time and persistence. Throw six variations of the same item, evaluate them as you throw. Line them up. Look closely. What makes some better than others? Maybe discard a few. Take notes on weight and wet dimensions. When fired, are they too small, too big, clumsy, whatever…. By this time a month has passed since you threw them, so those notes really come in handy when you go back to the wheel and make more.
THROWING EXERCISES
- Using the same amount of clay each time, see how tall a cylinder you can throw.
- Cut each one open to observe the thickness and evenness of the wall.
- Throw a round form for a teapot base.
- Throw a tall thin bottle form.
- Throw a tall bowl.
- Throw a wide shallow bowl.
- Throw a plate.
- Throw a baking/spoufle dish with a flat bottom and straight sides.
- Throw a mug.
- Throw a honeypot or small casserole with a lip flange and lid.
- Throw a teapot spout.
- Make an assortment of lid styles.
- Make a fat pot that necks in at the top.
- Alter each of the above forms while it is still on the wheel.
- Observe pots and try to analyze what makes them good or bad.
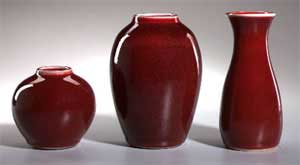
- Think in anatomical parts, i.e. lip, neck, shoulder, belly, foot.
- Think emotionally: is it sensual, open, friendly, curious, whimsical, or distressed?
OBSERVE FORM, COLOR AND DECORATION SEPARATELY.
- Do they all work together?
- Does it look light, heavy, ethereal or clumsy?
- Where is the visual center of weight?
- Where is the physical center (top to bottom)
- How far up the pot are the skinniest and fattest parts?
- Where do the lines take your eyes?
- Look at the “S” curves.
- What is the relation of the width of the foot to the neck and lip?
- Are any parts exaggerated, and if so, is this an asset?
- Is there a sense of movement?
- Is there a sense of balance?
- Is there a sense of tension?
- Is it purely decorative?
- Is it truly functional?
Is the golden mean used? - Pots with handles, spouts or other additions are more complex. Do all the parts work together functionally and aesthetically?
- How do all of the above relate to one another?
- Sketch some pots. Use tracing paper. Draw only the right side. Fold and trace the left to make it symmetrical. Analyze it.
- I find “The Golden Mean” very useful in developing classical forms with pleasing proportions. Look up Golden Mean on the web.
Links to helpful videos and pages my website
-
- More advanced demonstrations that will help you in class
- Trimming help
- Dig Deeper – This is link to more links…